Step 09: Install Serial Advanced Technology Attachment (SATA) Storage (Optional)
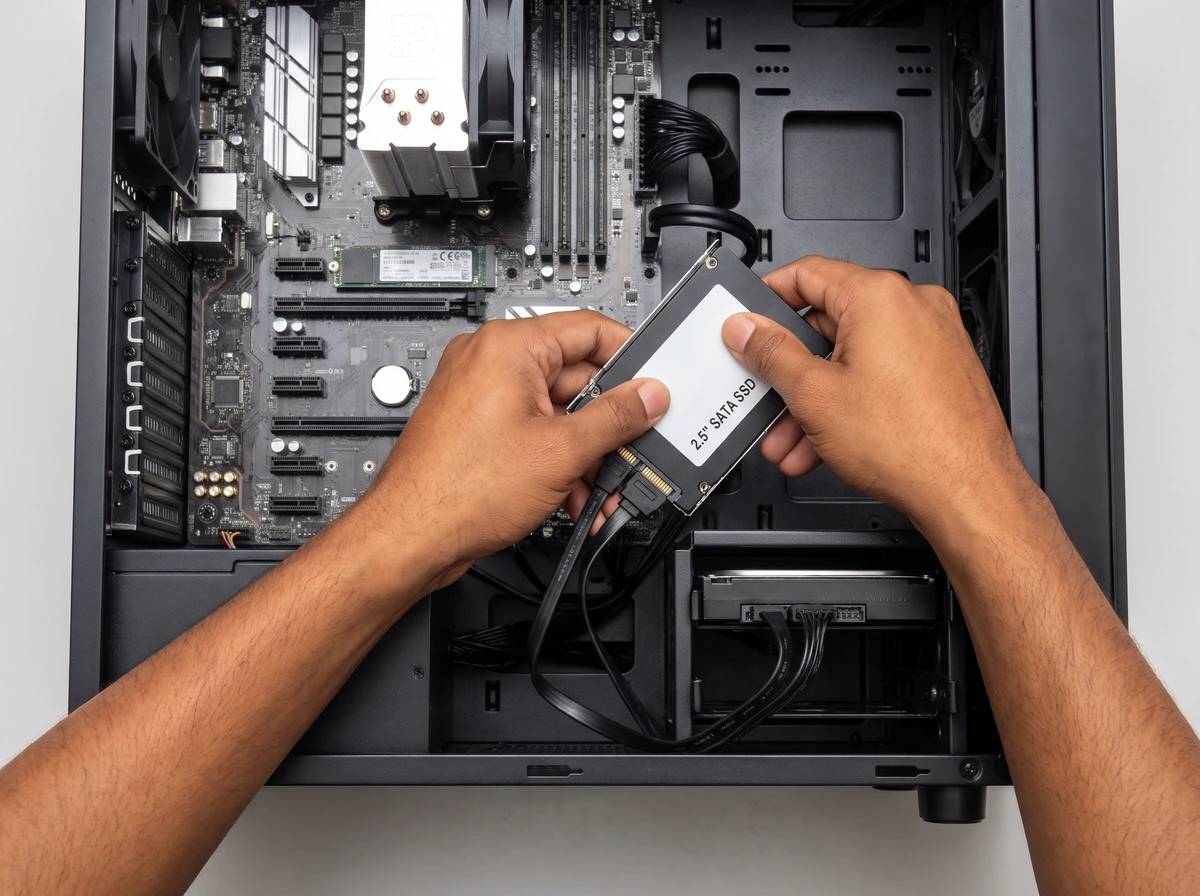
Optional for M.2-only builds: mount a 2.5-inch SATA Solid-State Drive (SSD) or 3.5-inch Hard Disk Drive (HDD) in its drive tray, connect the L-keyed SATA data cable to the motherboard and attach SATA power from the Power Supply Unit (PSU).
Step-by-Step Instructions
Identify the appropriate case mounting bay or drive tray
Locate the 2.5-inch SSD mounting brackets (typically behind the motherboard tray or on top of the PSU shroud) or the removable 3.5-inch HDD sleds inside the lower drive cage.
Secure the 2.5-inch SSD or 3.5-inch HDD using the appropriate mounting hardware
Fasten 2.5-inch SSDs to their bracket with the fine-thread screws supplied with your case, or snap/screw 3.5-inch mechanical hard drives into the vibration-damped drive tray with the drive's connectors facing the cable routing side.
Connect the SATA data cable to the drive
Align the L-shaped key inside the narrow 7-pin SATA data cable with the corresponding L-shaped data port on the drive and press it straight in until it latches.
Connect the other end to a compatible motherboard SATA port
Route the SATA data cable to the motherboard's SATA ports (usually along the lower-right edge) and plug it into an enabled SATA header.
Connect SATA power from the PSU
Align the L-shaped key inside the wide 15-pin SATA power connector from the power supply with the drive's wider power port and push it in firmly and straight; every SATA drive requires both the narrow SATA data cable and the wide SATA power cable.
Note that Non-Volatile Memory Express (NVMe) M.2 drives do not use separate cables
M.2 drives installed in Step 05 receive both data and power directly through the motherboard's M.2 slot and require zero external cables.
Check motherboard lane sharing and disabled SATA ports in the manual
On some motherboards, populating certain secondary M.2 slots shares bandwidth with and disables specific SATA ports (for example, SATA_5 and SATA_6). Consult your motherboard manual's storage table to ensure you use an active SATA port.
Important Warnings & Precautions
- Always align the L-shaped key inside SATA data and SATA power connectors before pushing, because forcing an inverted SATA connector can snap the plastic L-tongue off the drive.
- Do not forget to connect BOTH the SATA data cable (to the motherboard) and the SATA power cable (from the PSU) to each 2.5-inch or 3.5-inch SATA drive.
Step 09 Completion Checklist
Confirm every item below before moving to the next step:
- Step skipped if the build uses only M.2 drives, OR:
- 2.5-inch SSDs / 3.5-inch HDDs mounted securely in their trays.
- L-keyed 7-pin SATA data cable connected between the drive and an active motherboard SATA port.
- L-keyed 15-pin SATA power cable connected from the PSU to the drive.
Relevant Components in This Step
Open any component page to review its physical parts, types and specifications: